
As promised, here’s the second part of my playthrough, and we’re on the final scenario in the Rogers’ Rangers campaign, having just lost two precious units…
THE COMBAT SYSTEM
Up until now, we’ve been quite fortunate with our choices, and combat has been a tad limited, but it might be worth briefly covering the combat system before continuing, so here goes…
Once the number of hostile units has been determined (usually as detailed by the Ops cards), each side rolls to see who has Tactical Edge — this is especially important, because it decides who attacks first. Leaders always provide a +1 bonus to the Tactical Edge roll for their side, but as mentioned last time the Long Rifle also provides a +1 modifier to this roll (one of the reasons I chose to start each mission with it).
Once Tactical Edge has been determined, the hostile forces are arranged from strongest to weakest combat values (top to bottom), while you as the player can line your units up in whichever order you like (again, however, you arrange them from top to bottom but cannot change this order).
A typical conflict might look something like this at the start, with the hostiles on the left (blue) and our units on the right (green)…
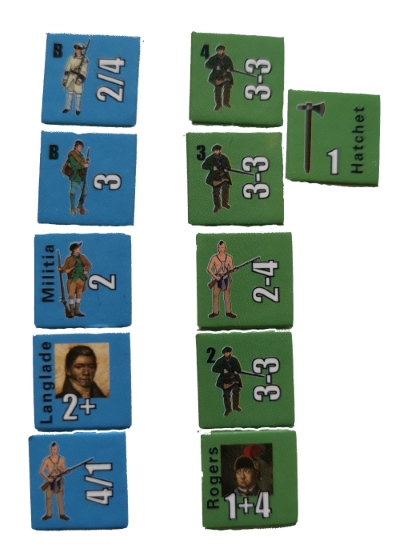 The side with Tactical Edge always gets to attack first in each combat round, and once a unit has fired, it cannot fire again until the next round. Play passes back and forth between sides until all units have either had an opportunity to fire, or are eliminated. The rules are the same for the player and the system-controlled hostiles, and to eliminate an enemy unit, you need to choose which unit you’re firing at first, and then roll less than or equal to your own unit’s Combat Value. You’ll note that a Hatchet also provides a +1 Combat modifier, so in the example above, my top unit is actually attacking with a Combat Value of 4 (the second value, +1 for the Hatchet), while the hostiles will be attacking sequentially with a 4, then with a 3, then a 2, then another 2, and then a 1… A good strategy is to target either the stronger units near the top, or those units that haven’t fired yet, because destroying these will obviously prevent them from firing back (they’ll hopefully be eliminated before getting the chance to do so).
Combat proceeds in rounds until all the units of one side are eliminated. If the player’s units are eliminated, all the equipment/gear they had is also destroyed, but if the hostiles lose, they’re just returned to the hostiles kitty (a small dish with all the hostile chits face down), ready to possibly appear in a future turn. The net result is usually a gain or loss of turns for this scenario (Ops cards).
SCENARIO FOUR: Big Campaign cont’d…
If you recall, our first turn (aka First Op) for this scenario was disastrous: we lost two units and some valuable gear right off the bat…
Second Op:
Rogers and 2 x Rangers decide to follow in the footsteps of the first troop and head up to Fort No 4, but with a higher movement value they get to the following wilderness space — movement is limited by the slowest unit. The Ops card this time is ‘Wilderness Challenge’, and since we no longer have Boats, we lose an Op (one less turn). Ouch.
 Third Op:
1 x Ranger and 1 x Friendly Indian (with Hatchet) head north directly towards the last two remaining objective markers, but have to stop at Ticonderoga (because it’s a French fort). The Ops card is ‘Indian Ambush’ (again!) but luckily we rolled a 6: that’s above the Alert Level of 4, so thankfully there is no combat this turn. Phew!
Fourth Op:
Our Ranger and Indian press on to Crown Point (another French fort) and draw the ‘Ranger Relief Column’ Ops card, which would be a great boon if we hadn’t rolled a 6 again, so that’s another No Effect. Grrr.
Fifth Op:
Rogers & Co. move along the top of the map towards Fort Wentworth where they have to stop because of the presence of an objective marker (even though it’s a revealed one). In this instance, we know it’s the Depot, but they can’t actually destroy it at the moment — with the Pioneer dead and no additional Gunpowder Barrels having been bought with my Recruit Points at the start of the scenario, I’m left to hope there’ll be an opportunity to acquire this vital Gear later on, because this will severely hamper our chances of successfully completing the campaign otherwise. For now, we’ll have to concentrate on the second objective: Triggering the ‘Ambush’ objective marker, but we don’t know where that is at the moment… The Ops card we draw this turn is ‘Massacre’ but despite the name, this doesn’t do much other than potentially move an objective marker from one spot to another, but in this case has no effect, thankfully – I’m really feeling the tension now, and having had my primary force eliminated in turn one, feel like combat is the last thing I need…
Sixth Op:
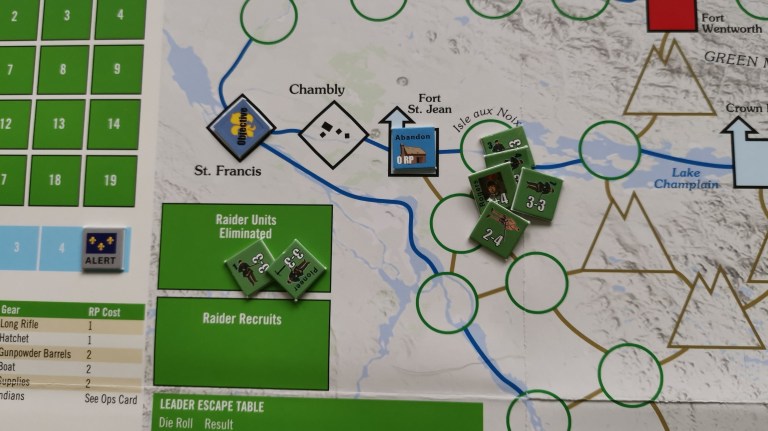
My remaining units, a Ranger and friendly Indian head north towards Fort St Jean, but the Indian movement limit of 2 means they have to stop at Isle aux Noux. The Ops card we draw is ‘Courier de Bois’ which basically raises the Alert level by one, so it’s now at the maximum of 5 — OMG!
Seventh Op:
Rogers & Co. are going to try and join up with the others so they head down towards Isle aux Noix, but have to stop in the Mountain space first. The Ops card is ‘Supply Check’, but with no Supplies (another thing I could have spent my Recruit Points on at the start) we lose another Op, significantly reducing our chances of mission success now (including the result in the second turn, that’s two less turns we have to try and win).
Eighth Op:
 Rogers & his two Rangers successfully join up with the other Ranger and Indian on this turn, making up a significant force between them (the stacking limit is 6 for this scenario)… The Ops card we draw is ‘Montcalm’s Army’ and that means 5 x French units appearing. This could be the end of the road for us, and the forces line up as shown in the image above (see Combat System above)…
Wowsers! Having Tactical Edge (with our Leader and Hatchet giving +2 vs the hostile Leader Langlade’s +1) meant we got to fire first and this really made all the difference: the French units were all eliminated with nary a scratch to our own forces! Winning this combat also gives us 2 extra Ops (turns) which could prove significant…
 Ninth Op:
At this point, and for the first time in the entire campaign, I am considering using a Scout action at the start of the turn (to try and discover what Objective lies waiting in the French-controlled Fort St. Jean) but we just don’t have time and really need to Trigger the ‘Ambush’ objective marker, so we plunge straight in. The Ops card this turn is ‘Fortunes of War’ (a random event based on a single die roll), but rolling a 6 means we have to give up our Hatchet: annoying, but not completely disastrous. The revealed Objective at Fort St. Jean turns out to be an Abandoned camp, so we need to press on to St. Francis for the Ambush…
Tenth Op:
All our units now move through the village of Chambly and into St. Francis. The Ops card is ‘French Discover Ranger Camp’ which has no effect because we don’t have a camp anywhere. Sure enough, the final Objective marker is of course the Ambush we’ve been looking for, and it’s 5 vs 5 again…
Alas, this time, and despite having the Tactical Edge advantage, the dice were not so kind for us, resulting in all our units getting eliminated, and 3 x French units still standing. Awww!
As an adjunct, Rogers himself managed to escape back to Rogers Island (using the Leader Escape Table), but there’s not enough time to get back into the fight (just two turns left), so we have to give up on this one, which is a damn shame — ’twas a bloody good effort, though, I say!
IN SUMMARY
I can hand-on-heart say I enjoyed this game, and if I played it again, I’d probably make sure I had additional Gunpowder Barrels for the last scenario (instead of depending on my Pioneer for demolition purposes — he didn’t last long in that last scenario, did he?)
In wargame terms, the rules are relatively easy to understand and follow compared to many, and the game itself quite simple (but as you’ll note there’s still room for mistakes to occur)… There are a few ambiguities and grey areas, but as long as you hold on to the fact that this is a game that’s meant to be played and enjoyed, you can generally work round most queries. And let’s be honest, it’s designed as a solo experience, so no-one’s judging!
At less than £15-20 (less than $15 in the US), I’ve no problems recommending this as well worth a try. These Decision Games ‘mini games’ are all quite beginner-friendly, too, so if you’ve been wondering about stepping into the world of chit and counter wargames, you could do a lot worse than try your hand at a couple – that’s certainly one of the reasons they appealed to me.
Thank you for following along… I hope you’ve enjoyed it — I genuinely liked writing this report up, so could easily be tempted to do more with other games from the series at a future date…
ADDITIONAL NOTES/ERRATA:
(1) — There is an Indian Unpredictability rule (31.4) which requires a die roll to test the loyalty of any Indian unit after any combat. I completely missed this in my playthrough. Sorry!
(2) — There is another rule (20.2) giving you the chance to gain a leader after winning a battle (roll a die and get a 6), but I chose not to use this rule, anyway…
