
Designer: Joseph Miranda
Publisher: Decision Games
1 players, 30-45mins per scenario
Price: £12-20 approx.
I’ve managed at least two game reviews a month this year, but figured I’d try and do something different this time, so here is my first solo playthrough of Rogers’ Rangers: America’s First Commandos, which is one of a great many chit and counter wargames in Decision Games’ Mini Game Series – I have several more which I hope to cover in due course, but let’s see how this one goes down first…
INTRODUCTION
The clue is in the name, but basically the Mini Game Series is a collection of small footprint games (no more than A3-size table space req’d), sharing a similar set of rules, but with a limited no. of counters (chits) and a small deck of cards in each (18 in this game). The cards usually have the details for four individual scenarios that can be played on their own or strung together to form a campaign game (which is what I’m playing through, here), with the rest of the deck forming a collection of random events that are drawn each turn (called Operation cards, or Ops for short).
This particular game is based on the core Raiders mini game system, but there are several others all based on slightly different rulesets. In Rogers’ Rangers, you take command of a small set of British forces during the French and Indian War (1754-63), and must battle your way through each scenario, completing the relevant objectives while the game controls the French and Indian hostiles that appear randomly depending on which Ops cards are drawn, and/or which spaces are explored on the map.
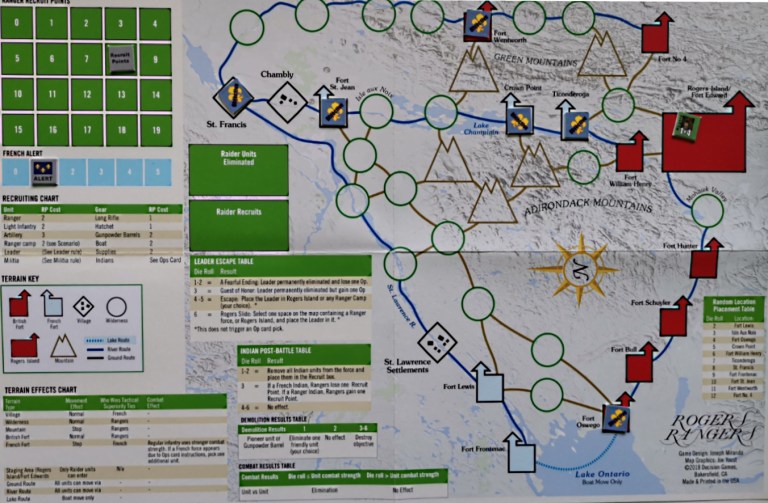
The map is neat and compact, and does away with some of the vagaries of other mapping systems by presenting spaces as different shapes and colours, which is something I actually rather like – it gives the game an instant ‘presence’ on the table as well, which is nice…
The game is played in turns (called Ops, which relates to the cards you have to draw every turn), and each scenario gives you a limited number of them (Ops cards) to try and complete the mission and objectives being set. The four scenarios are ‘Scouting’, ‘Frontier Raiding’, ‘Rescue’, and ‘Big Campaign’ and that’s the order I played through them…


Just as a quick aside, before each game you need to set up the map by rolling dice and distributing the Objective markers face-down onto the relevant spaces as indicated by the dice roll, so every game/scenario is different. With that said, because I chose to play through all the scenarios as a single campaign, I chose to do this just once at the start and then rolled with it, which actually turned out pretty fortuitous, but let’s not spoil anything just yet. Your own units/forces always begin at Rogers Island (aka Fort Edward) at the start of each scenario.
SCENARIO ONE: Rescue
The first scenario is a straightforward Scouting mission, and you are given 8 Recruitment Points (RPs) and 6 Turns (Ops) in which to find the Intel objective counter on the map. The Command value for each scenario (see above) indicates how many units can be stacked in the same space, and as well as individual units, there are also bits of equipment (called Gear) you can choose to spend your RPs on: these give various benefits, and are well worth their cost most of the time.
Major Robert Rogers (yes, he of the title) starts every mission, and is your main Leader. In addition, I chose to use my RPs to start with a Pioneer (good at blowing stuff up), a Light Infantry unit (fast at moving), and various bits of equipment: a Hatchet gives me a +1 Combat modifier, Boats let me move much further along water routes, and a Long Rifle gives me a +1 modifier to my Tactical Edge roll (which is used to determine who shoots first in combat).
So with my units at the ready, I set off…
Turns follow the same basic format: Recruit/Scout (if poss), Move, Draw an Ops card, Combat (if applicable), and Reveal Objective (again, only when applicable).
 First Op (Turn 1):
I chose to move my Light Infantry (with Boats and Long Rifle) down to Fort Oswego where an objective marker was sitting. The Boats extend my movement range, but you have to stop when you’re on a space with an objective marker, anyway. The Ops card I drew was ‘Montcalm’s Army’, which was annoying because the pop-up 2 x French units that appeared promptly destroyed my Light Infantry, resulting in the loss of my Boats and Rifle gear, two less turns in which to complete the mission, and a raised Alert Level too! Oh dear, that didn’t go so well. At least I still managed to flip over the objective marker* to reveal the Hostile Village. This proved significant for a later scenario, but we’ll get to that.
*ERRATA: I’m not sure I should have revealed this Objective, because technically my unit(s) didn’t complete their Operation in that space, but what’s done is done, so to speak…
 Second Op (Turn 2):
Rogers and the Pioneer head out to Ticonderoga (with the Hatchet), but are stopped by the presence of another objective marker (and the fact that it’s a French-controlled fort as well). The Ops card this time is ‘Ranger Relief Column’, which would be really useful but I failed my Alert check roll, which meant there was No Effect: a tad frustrating given that I’ve already lost some valuable equipment. This time the Revealed Objective was Prisoners to be rescued, but given that time was now of the essence, we had to move right along, so we just left them there!
Third Op (Turn 3):
Rogers & Co. pushed on to Crown Point (another French fort, which contained another objective marker). The Ops card this turn was ‘Courier de Bois’ which basically just raises the Alert Level (which is now 4 btw – the maximum is 5, and that’s often how many units will attack if an Ops card calls for it). Fortunately, the objective marker at Crown Point proved to be the Intel we’d been looking for, so that meant Mission Accomplished, and wrapped up the first scenario rather neatly. Phew!
So we’re off to a good start, at least, and at the end of each scenario you gain the benefit listed for successfully completing a mission, but also have to add 1 to the starting Alert Level of the next one, which makes things a bit trickier.
SCENARIO TWO: Frontier Raiding
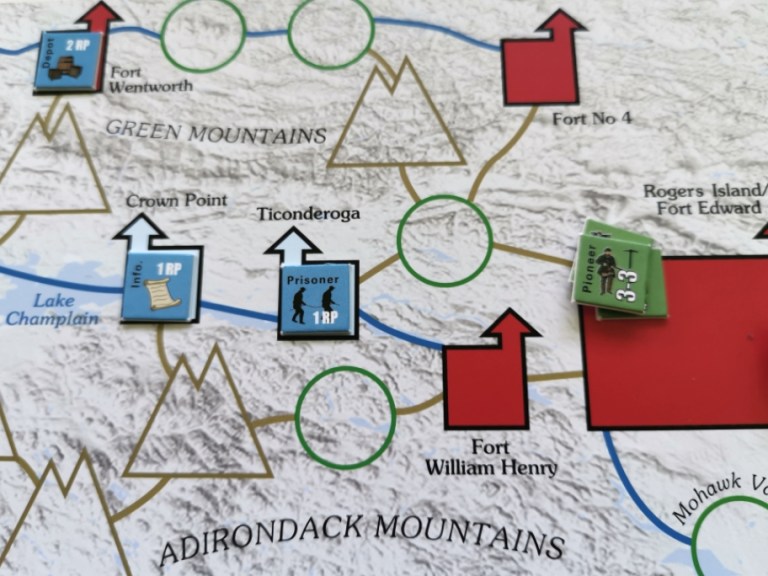
Now blind luck it may’ve been, but obviously we had already discovered where the Hostile Village was for the second mission objective (“Destroy the Hostile Village” as shown in the pic above), so this scenario should just be a case of nipping down to Fort Oswego and destroying that objective, right? Plus, we had some additional forces to start this scenario with (12 RPs instead of 8), so this should be a breeze, yeh? Yup, it was actually, which made for an easy win…
First Op:
Sure enough, we took our Light Infantry and Pioneer (with a Boat) back down to Fort Oswego in order to destroy the Hostile Village objective there. The revealed Ops card was ‘Wilderness Challenge’ which resulted in us gaining an additional Op (turn) for this scenario. As it happens, we didn’t need that, and our Pioneer successfully destroyed the Hostile Village with their first attempt. Mission accomplished. That one was easy.
SCENARIO THREE: Rescue
In this third scenario, we got lucky once again because the mission objective was just to recover and rescue those Prisoners we found at Ticonderoga in the first scenario! I kid you not, I did not look at these scenarios or even know what was written on each card when I started this campaign, but this obviously gave us another huge advantage for this mission… and I had 10 RPs to play with this time.
First Op:
Rogers and 2 x Rangers head out to Fort William Henry but are stopped by Rogers movement limit of 1*. The Ops card revealed is once again ‘Montcalm’s Army’ but this time the three French units that appeared (incl. 1 x Leader) were utterly destroyed by my forces. Hoorah!
*ERRATA: I got Rogers movement and combat figures the wrong way round for this scenario, so I didn’t actually need to stop at Fort William Henry on turns 1 and 3 anyway (see below), but ne’ermind…
Second Op:
Rogers & Co. head to Ticonderoga to recover and rescue the Prisoners there. The Ops card is an ‘Indian Ambush’ this time, but the ‘hostiles’ are just two French Indians and despite these fighting better in French forts, our plucky Rangers are more than equal to the task and dispatched them both quite easily. So we just need to return those Prisoners back to base now, I guess…
Third Op:
Rogers & Co. head back to camp, but have to stop at Fort William Henry once again, this time with their Prisoners. The Ops card this turn is ‘French Discover Raider Camp’ but since we have no camp on the map, this doesn’t affect us at all. A good result, all things considered.
Fourth Op:
Rogers & Co. return to base with the Prisoners and that wraps up another successful mission. Wowsers, that went really well, too. It’s all going far too swimmingly so far, isn’t it? Give it time…
SCENARIO FOUR: Big Campaign
For the fourth and final scenario of this campaign, we get a whopping 15 RPs to start with, and 12 turns, but have two separate missions to complete: we have to destroy the Depot objective marker, as well as find and trigger the Ambush objective marker. This time I started with Rogers himself (of course), 4 x Rangers, a Pioneer, a Friendly Indian and the same equipment: a Hatchet, Boats, and a Long Rifle… As it happens, the Intel we found for the first scenario had already allowed us to reveal one Objective for successfully completing that mission, and that just happened to be the Depot, sitting comfortably along the top of the map at Fort Wentworth…
First Op:
1 x Ranger and 1 x Pioneer (with Long Rifle and Boats) head up to Fort No 4, intending to destroy the Depot using the Pioneer’s explosive ability, and also explore the top of the map more efficiently with their Boats. Unfortunately, they are met by another ‘Indian Ambush’ Ops card and although it was just a French Militia and a single Leader this time, both my units were destroyed immediately, which means the Boats and Long Rifle are also gone. Shit, that’s a terrible start!
And d’you know what? I think I’m going to leave things there and keep you in suspense just a little longer, but I promise to finish this playthrough tomorrow…
